
View Reports
- Login to Mail Assure as an Admin Level user or as a Domain Level user
- Navigate to Reporting > ESR - Incoming/ESR - Outgoing
Inbound and outbound mail reports must be scheduled separately
-
The reports are split over the following three tabs:
- Email Scout Reports - This tab lists all of the currently scheduled Custom Email Scout Reports (ESRs)
- Automatic Email Scout Reports - Lists all schedules for automatically creating Email Scout Reports, custom Email Scout Reports that have been set to run on a repeated schedule and all automatic ESRs that have been configured from either:
- In Add a Domain > Settings by enabling Email Scout Reports
- In Incoming > Domain Settings by enabling Automatically Enable Daily Email Scout Reports
This option is due to be deprecated in the near future, please use one of the other methods of enabling ESR's for all new domains
- In Reporting > ESR - incoming > Automatic Email Scout Reports by clicking Add Automatic Email Scout Reports
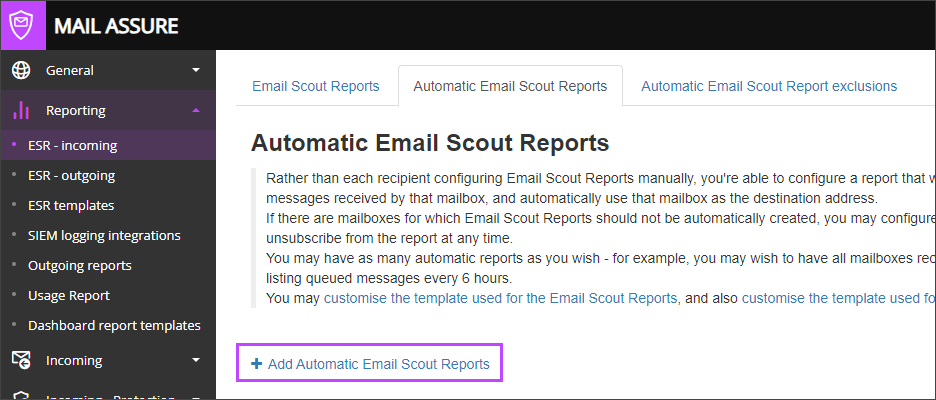
This option is only available once a domain that does not currently have Automatic Email Scout Reports enabled is queried using the Query Rules. If no domain is queried, or a domain that already has Automatic Email Scout Reports is, this button is hidden.
Or
- Automatic Email Scout Report Exclusions - Lists any mailboxes which have unsubscribed from receiving specific Email Scout Reports or excluded manually. Each schedule must be unsubscribed individually
- To search for a particular report, set your filters from the Query Rules panel e.g. you can specify a particular domain when accessing this page at the Admin Level, or a specific mailbox when searching at either Admin or Domain level
- Click on Show Results to display all scheduled Email Scout Reports matching the criteria in the table below

Actions on Custom Email Scout Reports
In the Email Scout Reports page you can perform various actions on the listed reports, using the dropdown to the left of each report:
- Execute search - Run the log search based on the original search filters when creating the report
- Edit - Allows you to edit the report details including:
- Name of the report
- Subject of the report
- Delivery schedule
- Sender
- Recipient
- Template name used
- Skip sending if there are no results
The sender should be a valid sender address such as no-reply@
- Remove - Removes the report
- Edit template - Allows you to edit the template used for the report
- Disable/Enable Report - Allows you to temporarily disable the Email Scout Report, meaning it will not run until re-enabled
- Send now - Send the ESR straight away to the recipient specified in the report
- Export as .CSV - Export report configuration as CSV file
Actions on Automatic Email Scout Reports
The Automatic Email Scout reports are templates for scheduled reports to be triggered in the future. Any changes made to the Automatic Email Scout Report configuration will not affect any previously scheduled reports. To ensure changes made to the template take effect in existing Email Scout Reports, either remove the existing instance of the report or manually edit the report with the desired changes from the Email Scout Reports tab.
In the Automatic Email Scout Reports page you can perform various actions on the listed reports, using the dropdown to the left of each report:
- Execute search - Run the log search based on the original search filters when creating the report
- Edit - Allows you to edit the report details including:
- Name of the report
- Subject of the report
- Delivery schedule
- Sender
- Template name used
The sender should be a valid sender address such as no-reply@
- Remove - Removes the report
- Export as .CSV - Export report configuration as CSV file
You can automatically enable Email Scout Reports so that they will be sent to each recipient in your domain, up to three times a day. Do this in Incoming - Domain Settings.
You can add and edit your own custom ESR templates. See ESR Templates.
Edit Automatic Email Scout Reports
Mail Assure allows editing of single or multiple ESR's.
- Login to Mail Assure as an Admin Level user
- In the Admin or Domain Level Control Panel, click on Reporting> ESR - Incoming or ESR - Outgoing
- Navigate to the Automatic Email Scout Reports tab
- Using the checkbox to the left of the listed reports, check the reports you wish to edit
- Using the Apply to Selected dropdown to choose the Edit action
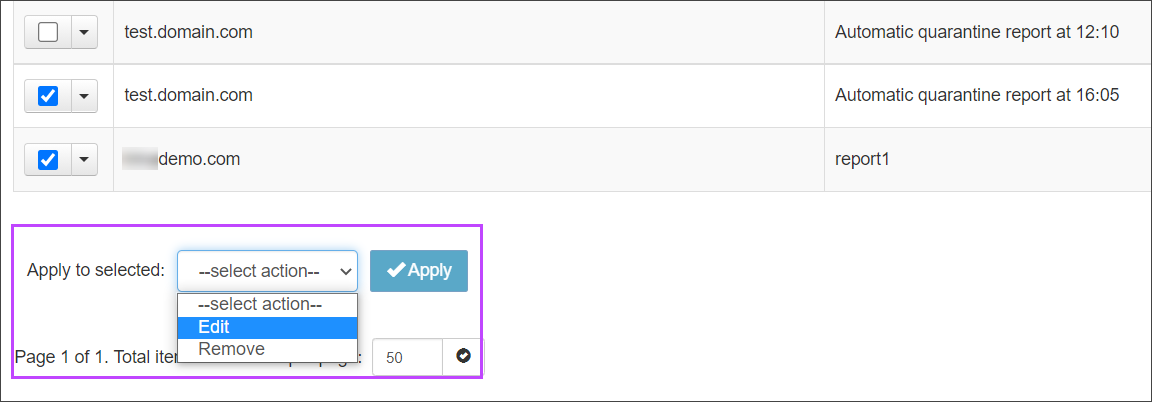
- Click Apply
- You will now see the Edit Report window. Make the necessary changes to the reports, but be aware that you cannot change the name of the report
The sender should be a valid sender address such as no-reply@
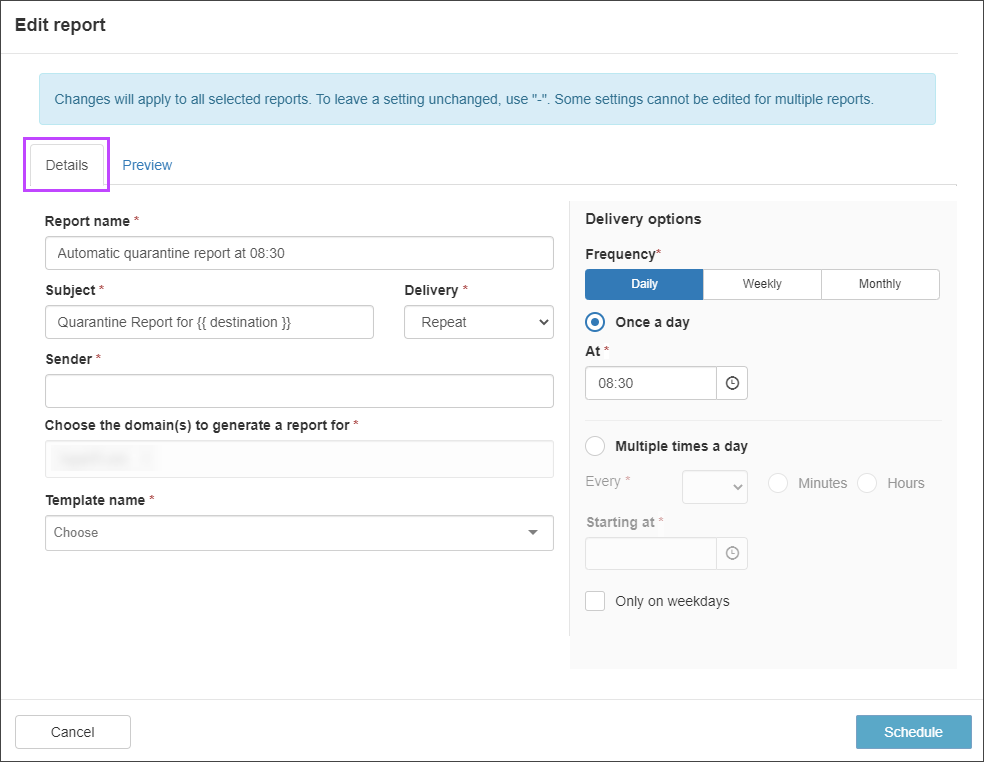
- Click Schedule
Any fields you do not wish to change or that cannot be changed in bulk will be filled with '-'.